To verify a domain
- Go to your verified domain list in the Amazon SES console, or follow these instructions to navigate to it:
- Sign in to the AWS Management Console and open the Amazon SES console at https://console.aws.amazon.com/ses/.
- In the navigation pane, under Identity Management, choose Domains.
- Choose Verify a New Domain.
- In the Verify a New Domain dialog box, enter the domain name.
Tip
If your domain is www.example.com, enter example.com as your domain. The "www." part isn't necessary, and the domain verification process won't succeed if you include it.
4.If you want to set up DKIM signing for this domain, choose Generate DKIM Settings. For information about DKIM signing, see Authenticating Email with DKIM in Amazon SES.
5.Choose Verify This Domain.
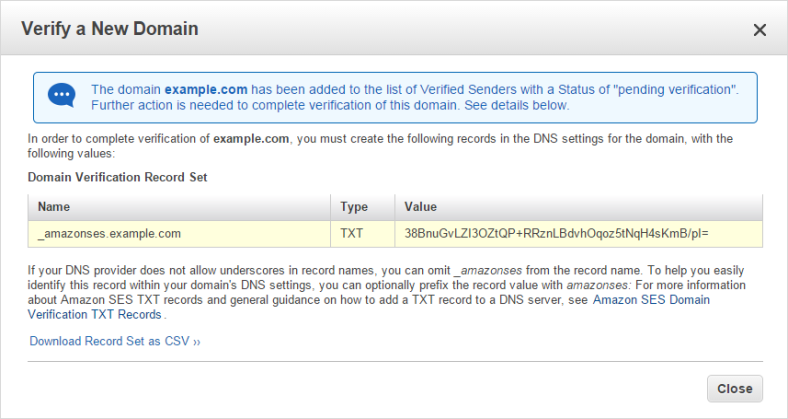
6.In the Verify a New Domain dialog box, you will see a Domain Verification Record Set containing a Name, a Type, and a Value. (This information will also be available by choosing the domain name after you close the dialog box.)
To complete domain verification, add a TXT record with the displayed Name and Value to your domain's DNS server. For information about Amazon SES TXT records and general guidance about how to add a TXT record to a DNS server, see Amazon SES Domain Verification TXT Records. In particular:
- If your DNS provider does not allow underscores in record names, you can omit _amazonses from the Name.
- To help you easily identify this record within your domain's DNS settings, you can optionally prefix the Value with amazonses:
- Some DNS providers automatically append the domain name to DNS record names. To avoid duplication of the domain name, you can add a period to the end of the domain name in the DNS record. This indicates that the record name is fully qualified and the DNS provider need not append an additional domain name.
7.Update your DNS to include the TXT record outlined in the “Domain Verification Record Set” table.
8.When verification is complete, the domain's status in the Amazon SES console changes from "pending verification" to "verified," and you receive a notification email from Amazon SES.
9.You can now use Amazon SES to send email from any address in the verified domain. To send a test email, check the box next to the verified domain, and then choose Send a Test Email.
If the DNS settings are not correctly updated, you will receive a domain verification failure email from Amazon SES, and the domain will display a status of failed on the Domains tab. If this happens, complete the steps on the troubleshooting page at Common Domain Verification Problems. After you verify that your TXT was created correctly, choose the retry link next to the failed status notification to restart the domain verification process.
Video Tutorial:
https://www.youtube.com/watch?v=V6jfjlyc7J4
Source:
https://docs.aws.amazon.com/ses/latest/DeveloperGuide/authenticate-domain.html
Configuring the MAIL FROM Domain
Setting Up a MAIL FROM Domain for a Verified Domain
You can configure a MAIL FROM domain for an entire domain. When you do, all of the messages that you send from addresses on that domain use the same MAIL FROM domain.
To configure a verified domain to use a specified MAIL FROM domain
- Open the Amazon SES console at https://console.aws.amazon.com/ses/.
- In the navigation pane, under Identity Management, choose Domains.
- In the list of domains, confirm that the parent domain of the MAIL FROM domain is verified. If the domain isn't verified, complete the procedures at Verifying Domains in Amazon SES to verify the domain. Otherwise, choose the domain and proceed to the next step.
- Under MAIL FROM Domain, choose Set MAIL FROM Domain.
- On the Set MAIL FROM Domain window, do the following:
- For MAIL FROM domain, enter the subdomain that you want to use as the MAIL FROM domain.
- For Behavior if MX record not found, choose one of the following options:
- Use region.amazonses.com as MAIL FROM – If the custom MAIL FROM domain's MX record is not set up correctly, Amazon SES will use a subdomain of amazonses.com. The subdomain varies based on the AWS Region in which you use Amazon SES.
- Reject message – If the custom MAIL FROM domain's MX record is not set up correctly, Amazon SES will return a MailFromDomainNotVerified error. Emails that you attempt to send from this domain will be automatically rejected.
c.Choose Set MAIL FROM Domain. A window appears that contains the MX and SPF records that you have to add to your domain's DNS configuration. These records use the formats shown in the following table.
Name | Type | Value |
subdomain.domain.com | MX | 10 feedback-smtp.region.amazonses.com |
subdomain.domain.com | TXT | v=spf1 include:amazonses.com -all |
d.In the preceding records, replace subdomain.domain.com with your MAIL FROM subdomain, and replace region with the name of the AWS Region where you want to verify the MAIL FROM domain (such as us-west-2, us-east-1, or eu-west-1).
e.Note these values, and then proceed to the next step. If you already have an SPF TXT record for subdomain.domain.com, DO NOT create a new only. simply add “include:amazonses.com” to the existing one.
6.Publish an MX record to the DNS server of the custom MAIL FROM domain.
Important
To successfully set up a custom MAIL FROM domain with Amazon SES, you must publish exactly one MX record to the DNS server of your MAIL FROM domain. If the MAIL FROM domain has multiple MX records, the custom MAIL FROM setup with Amazon SES will fail.
When Amazon SES detects that the records are in place, you receive an email informing you that your custom MAIL FROM domain was set up successfully. Depending on your DNS provider, there might be a delay of up to 72 hours before Amazon SES detects the MX record.

