
Overview
This guide walks you through connecting your Autotask PSA instance to PowerDMARC and configuring customer mapping, subscription synchronization, and alert-based ticketing. The integration is completed through a three-step wizard inside PowerDMARC, with a short one-time setup required in Autotask beforehand.
1. Prepare Autotask Access
Before connecting PowerDMARC, complete this one-time setup inside Autotask. You will create a dedicated API User to generate the credentials PowerDMARC needs to authenticate. This account does not consume a paid resource license.
1.1 Create an API User
Navigate to Admin → Resources (Users) → New API User. Give the user a clear name (e.g. PowerDMARC Sync) so it is easy to identify in audit logs — every ticket created by a DMARC alert will show this user as the creator.
Configure the API User with the following settings:
Username — Used as the API Username
Security Level — Select "API User (system)" — grants full API permissions with no license cost
Secret — Generate or paste a Secret (this is the API password)
1.2 Assign a Tracking Identifier
On the Security tab of the API User, assign a Tracking Identifier (Integration Code). Select "PowerDMARC" from the Vendor list if available, otherwise choose Custom (Internal Integration) — Autotask will auto-generate the code.
Copy the generated code. This is your API Integration Code.
1.3 Copy Your Credentials
Once the API User is created, copy the following three values — you will enter them into PowerDMARC in the next step:
Username — The API User's email address
Secret — The API password generated when the API User was created
API Integration Code — The Tracking Identifier assigned on the Security tab
2. Connect Autotask to PowerDMARC
In PowerDMARC, navigate to Integrations → Autotask and click Connect to Autotask to launch the three-step wizard.
Step 1 — Connection
Enter your Autotask API credentials to authenticate the connection:
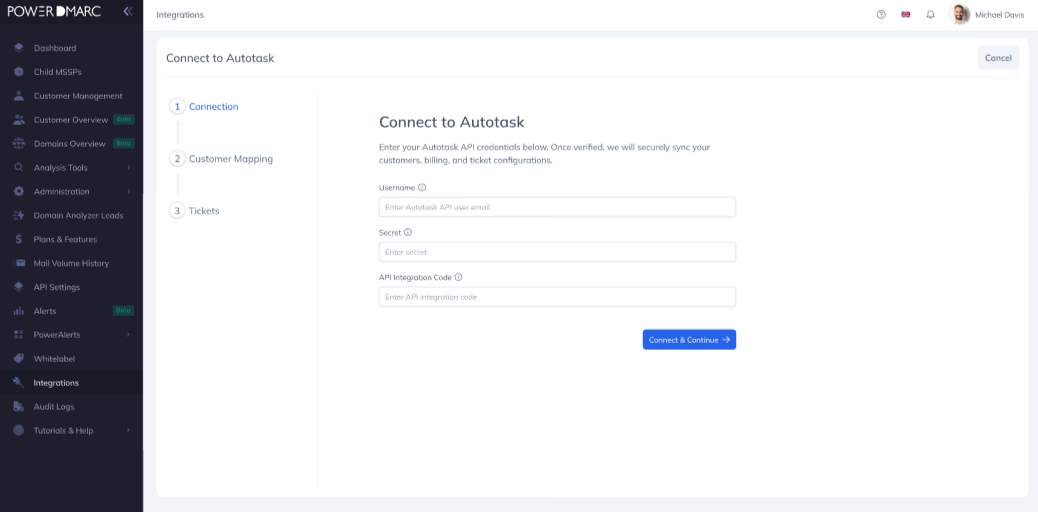
Username — Your API User's email address
Secret — The API password
API Integration Code — The Tracking Identifier from your API User's Security tab
Click Connect & Continue. PowerDMARC will automatically detect your Autotask zone, verify your credentials, and move you to Step 2.
3. Map Customers
Step 2 lets you link each PowerDMARC account to the corresponding Autotask Company, and optionally configure billing sync.
Enable Billing Sync (optional)
At the top of Step 2, you can enable or disable billing sync:
ON (default) — Creates and maintains Subscriptions in Autotask based on your active domain count. Mapping table shows 4 columns (Account, Company, Product, Billing Code)
OFF — Only automates ticket creation — no Subscriptions are created in Autotask. Mapping table shows 2 columns (Account, Company)
Complete the Mapping
For each customer, select the values in each column of the mapping table. Use + Add New to add rows manually, or + Add All Customers to pre-populate a row for every account. Use Resync at any time to refresh the list of Companies, Products, and Billing Codes from Autotask — existing valid selections are preserved.
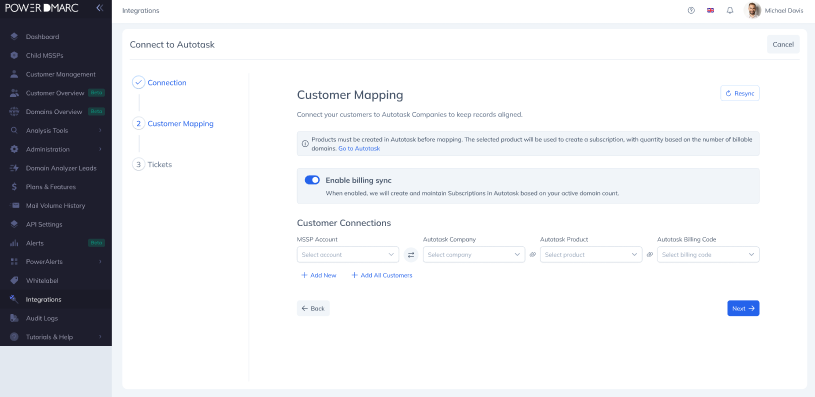
When billing sync is enabled, one Subscription is created per mapped customer on submission. PowerDMARC keeps the Subscription updated automatically whenever a domain is added, removed, deactivated, or moved — no manual reconciliation needed.
After configuring all mappings, click Next to continue to Step 3.
4. Map Alerts to Tickets
Step 3 lets you configure which DMARC alerts should automatically create tickets in Autotask, and set the ticket options for each customer.
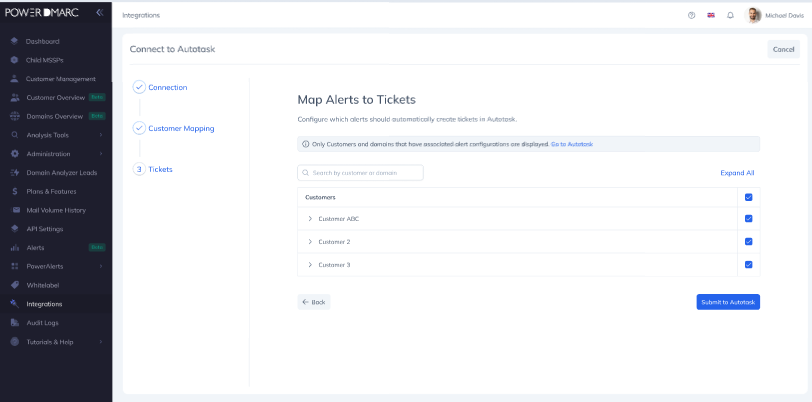
Click the arrow next to a customer to expand their configuration, or use Expand All to open all customers at once. Use the search bar to filter by customer name or domain.
For each customer, configure the following:
Ticket Category — Required. Pre-selects a category named "Alert" if one exists, otherwise defaults to the first available
Queue — Required. Determines routing inside Autotask. Defaults to "Service Desk" if it exists
Location — Optional. Filters the End User dropdown to show only Contacts at that Location
End User — Optional. The Autotask Contact who should be listed on the ticket
Then select which alert types and domains should trigger ticket creation — DNS Alerts, Threshold Alerts, and Forensic Alerts. You can select all domains for an alert type at once, or choose individual domains. Use the Resync button per customer to refresh Ticket Categories, Queues, Locations, and Contacts from Autotask.
When finished, click Submit to Autotask. This completes the initial setup.
5. Integration Summary
After submitting, you are taken to the Autotask integration overview page. A success notification confirms that all configurations and mappings have been submitted to Autotask.
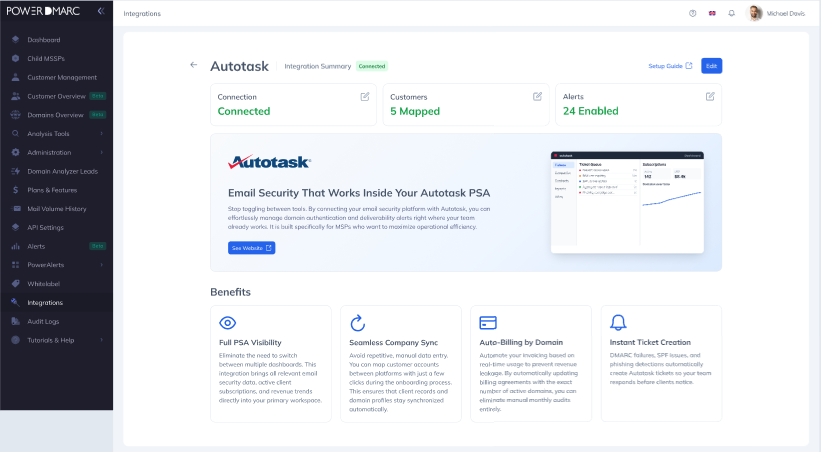
The summary shows three status cards at a glance:
Connection — Confirms the Autotask instance is authenticated and active
Customers — Number of accounts successfully mapped to Autotask Companies
Alerts — Number of alert types enabled for automatic ticket creation
Clicking any card takes you back to that step of the wizard to make changes. You can update your configuration at any time from Integrations → Autotask.
6. Access Control
The Autotask integration is available to MSSP accounts where the Autotask Integration toggle is enabled in account settings. Users must also have the Access Autotask Integration permission assigned to their role. By default this is granted to MSSP Owner and MSSP Admin roles, and can be extended to custom roles from the role management settings.
For further assistance, visit support.powerdmarc.com or contact your PowerDMARC account manager.